
A little introduction
WordPress is used by over 40% of all sites on the web today, making it one of the most popular content management systems or CMS. It is easy to use and customizable to fit the needs of anyone who would like to stake their claim to a little bit of web real estate and using headless WordPress offers even greater ways to utilize all the power WordPress offers, especially if you have a bit more technical knowledge.
When you go headless WordPress becomes the place where you store your data, which can be accessed using the WordPress REST API. The REST API facilitates communication between WordPress and an outside application, allowing you to retrieve and display data on your site outside of your WordPress dashboard or installation. Using headless WordPress with technology like Next.js creates an easily scalable site with improved performance.
Next.js is a full-stack React web framework, developed and maintained by Vercel, Inc, a hosting company. Many large companies, Hulu, Netflix, and Nike to name a few, are now using Next.js for their websites and it is one of the most commonly chosen frameworks for websites using React. So, what is React? React is a JavaScript library that allows you to build user interfaces, UI, with reusable components that can be independently re-rendered when necessary. Components are powerful, make it easy to write, organize, and reuse code across your application, and are a great partner for headless WordPress to help make the most out of your site.
Building a Static Headless site using Next.js
Now, let’s walk through the process of creating a site on Shifter Headless using Next.js.
First you want to create a Shifter account (if you don’t already have one) and set up a Headless site.
There are two ways to build a site using Next.js:
- Static Generation: the page is rendered in static HTML on the server ahead of a request, such as at build time, allowing data to be globally cached by a CDN and instantly served. Static Generation has higher performance but data may be stale at request time, since your site is pre-rendered.
- Server-side Rendering: HTML is rendered on the server at each request and data is kept current. This, however, is a slower process.
Both have their advantages and disadvantages, there are also more advanced configurations available, but here we will use the first option and create a site using Static Generation that can be published to places such as Netlify, among others.
One thing to note as we go through the process is that it is not practical to show all of the sample site code in this guide. However, the source code for the sample site is available here, on GitHub.
If you build a site following the example code, your site should look something like this:

The full example site can be viewed here.
Application Setup
To set up your Next.js application use the create-next-app command:
$ npx create-next-app
# or
$ yarn create next-app
If you are using the sample site code mentioned above you can specify the repository name like this:
$ npx create-next-app YOUR_APP_NAME --example "https://github.com/getshifter/shifter-headless-nextjs-typescript"You may notice that we are using TypeScript in the sample code, just in case you are unfamiliar with TypeScript, here are some of the benefits of using the language:
- It expands upon JavaScript, all valid JS is valid TypeScript
- Types, a way to specify the intended use for the data, indicate what any given variable should be (number, boolean, etc.)
- Types can be traced easily across large scale projects and allows for easy collaboration between team members with less chance for errors
- Your favorite IDE may already have support for TypeScript built in, allowing for clear error indications and intelligent assistance when writing your code
Nextjs now makes it easier to set up a project from scratch using TypeScript but if you are unfamiliar with TypeScript it may be beneficial to use the sample code as a sandbox to get a feel for working with it.
Pages in Next.js
You will notice that your new project has a ‘pages’ or an ‘app’ directory, this is where Next.js creates the templates for the pages of your site. You will notice an index/page.tsx[jsx/ts] file that will be the homepage of your site. If you want to display a list of your posts on this page, like the sample site, or on any other page you will need to write the code that retrieves that information from the API in the file of the desired page.
Using fetch to retrieve data
There are many libraries to get data from external APIs but in our example we will be using polyfill fetch, you can use your favorite if you have created your project from scratch. You can install fetch with the following command:
npm i fetch-polyfillYou can implement the code to add a simple article listing to the index page using the following:
const urlBuilder = WPAPIURLFactory.init(process.env.WORDPRESS_URL)
  .postType("posts")
  .startAt(1)
  .perPage(50)
  .withEmbed();

export const Home: FC<{
  posts: WPPost[];
}> = ({ posts }) => {
  return (
    <div>
    {//more code in github example}
      <Archives posts={posts} />
    </div>
  );
};

export const getStaticProps: GetStaticProps = async () => {
  const url = urlBuilder.getURL();
  const posts = await fetch(url);
  return {
    props: {
      posts,
    },
  };
};
You will notice that we use getStaticProps in the above code. With Next.js, you can make your site even faster by using the getStaticProps function to call on the WordPress API and getting the article data when the site is built. By using this method, that list of articles is displayed until the next time the frontend needs to complete the article list retrieval process.
You can see that we use a component called “Archives” here and pass the posts returned from the API into the component for display on the page. Within this component we use a “PostTemplate” that will display each post returned in a style of your choosing.
export const PostTemplate = (post: WPPost) => {
  const featuredImage = getThePostFeatureImage(post, "large");
  const author = getThePostAuthor(post);
  const terms = post._embedded["wp:term"];
  //more code in github example
  return (
    <article
      key={post.id}
      className="relative isolate flex flex-col gap-8 lg:flex-row"
    >
      <div className="relative aspect-[16/9] sm:aspect-[2/1] lg:aspect-square lg:w-64 lg:shrink-0">
        {featuredImage ? (
          <img /> {//more code in GitHub example}
        ) : null
      </div>
        <div className="group relative max-w-xl">
          <h3 className="mt-3 text-lg font-semibold leading-6 text-gray-900 dark:text-gray-100 group-hover:text-gray-600 dark:group-hover:text-gray-300">
            <Link href={decodeURI(post.slug)}>
              {post.title.rendered}
            </Link>
          </h3>
          <div dangerouslySetInnerHTML={{ __html: post.excerpt.rendered }} />
        </div>
       </div>
 </article>
  );
};
You might notice that the article information returned from the API does not include the category tags, the thumbnail, and the author information. This is default behavior but if you would like to include this data on your page, be sure to add an _embed query to your API request. You can see that we add a request for those items in the above code for the “Post Template” component.
You can also see that we have wrapped the post title in a Link element as a way to navigate to the full content of your post on a separate page.
Create an individual article page
Now that we have created the link to the individual article page, we need to create the page template that will display the article content. These pages that are generated dynamically in a place outside of Next.js, like WordPress posts as we are using here, will use the Dynamic Routing function. Create a file within the pages directory called [slug/id].tsx/jsx/ts to indicate the page that will display content from the requested post_slug or post_id. You can now pass slug or id as an argument in getStaticProps to retrieve the article from the WordPress API.
Since we are using getStaticProps to retrieve data we also need to know about the function getStaticPaths. The getStaticPaths function allows us to get a list of the paths that we need generated statically in Next.js. Since the page with the path returned from this function will be generated as static HTML, we can get the data from the WordPress API, convert it to the required form, and pass it on.
export const SinglePost: FC<{post?: WPPost;}> = ({ post }) => {
 //more code in GitHub example
  return (
    <>
      {featuredImage ? (
        <div
          style={{
            textAlign: "center",
          }}
        >
          <img
            src={featuredImage.source_url}
            width={featuredImage.witdh}
            height={featuredImage.height}
            alt={featuredImage.alt_text}
          />
        </div>
      ) : null}
      <>
        <h1>{post.title.rendered}</h1>
        <div>
          <div aria-label="Created">{formatPostDateToString(post)}</div>
          {author ? <div aria-label="Author">{author.name}</div> : null}
        </div>
      </>
      <div
        dangerouslySetInnerHTML={{
          __html: post.content.rendered,
        }}
      />
    </>
  );
};

export const getStaticPaths: GetStaticPaths = async () => {
  const posts = await listAllPosts(urlBuilder);
  return {
    paths: posts.map((post) => ({
      params: {
        id: post.id,
        slug: decodeURI(post.slug),
      },
    })),
    fallback: false,
  };
};
Testing in your local environment
Once you feel ready, it’s time to test your code locally. You can use the npm run dev or next dev commands to start up your Next.js application on your local machine.
We also want to test that the site can be converted to static HTML, as that is our ultimate goal with this example. This can be done using a combination of the next build command and the next export command, as shown below in your scripts.
...
"scripts": {
    "build:static": "next build && next export",
    "dev": "next dev",
    "start": "npx serve@latest out"
....
We can then run npm start for the npx serve out command to access the URL of the newly created static page.
Deploying the Site to Netlify
Once you have successfully tested and built your site locally, the last step is to publish and deploy it to Netlify or your preferred hosting service.
After you have committed your changes in Git, push the changes to your repository service such as GitHub or GitLab. The following demonstrates this process in the command line.
$ git add .
$ git commit -m "feat: ready for publish"
$ git push origin main
or
$ git push origin master
You should configure your repository build settings with your hosting service like this:
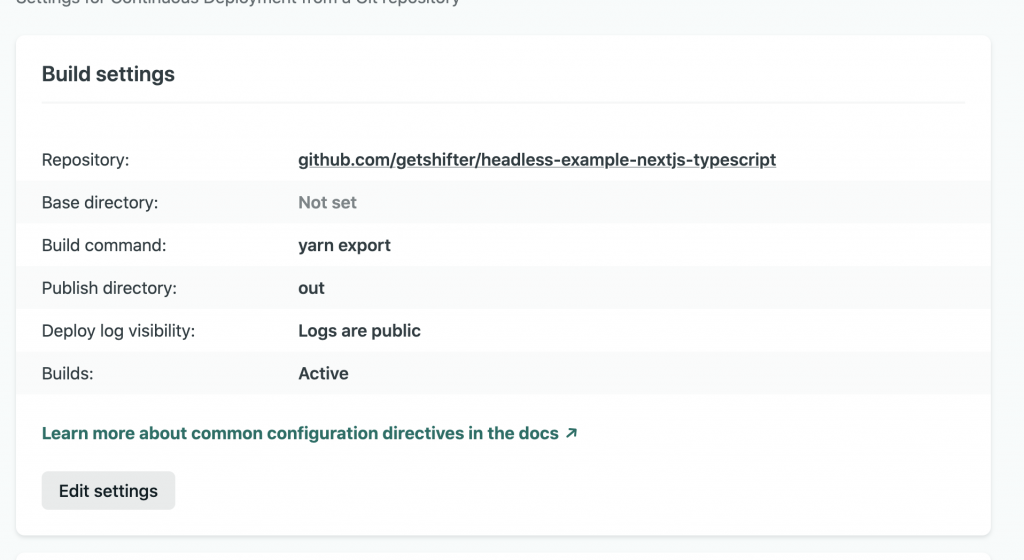
With the following settings using these values:
Build command: npm run export or yarn export
Publish directory: out
In conclusion
Next.js requires you to write a certain amount of React and JavaScript code, compared to other options like Gatsby, but Next.js also allows you to use and operate your application with a high degree of flexibility.
In addition to this example you can explore other ways to use Next.js, be sure to check out these options, dynamic processing using Vercel, and E-Commerce, and look out for additional blog posts exploring this topic!
